
This procedure will help guide you through factory resetting SonicWALL TZ firewalls and get access back to the configuration page using the default credentials. Updated for new 2026 models.
Steps to Factory Reset a SonicWALL TZ
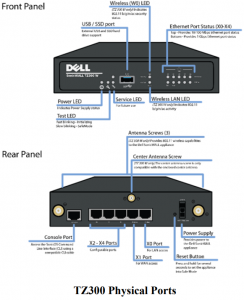
- Hold down the reset button for 10 seconds. The button is located next to the power jack. The device will reboot when you release the reset button.
- Connect a computer to the firewall LAN port.
- Set your computer’s IP address to 192.168.168.167, MASK 255.255.255.0. See below for details.
- Connect your computer to the LAN port on the SonicWALL TZ. Typically, X0.
- After the device reboots, it will be in recovery mode. Connect to it at http://192.168.168.168.
- Click the boot icon next to “Current Firmware with Factory Default Settings.“
- After the device reboots, you can again connect to it at http://192.168.168.168. The default login is: admin and password.
- At this point, the device is reset to factory defaults.
These factory reset instructions apply to the following SonicWALL TZ models and others:
| Gen 6 | Gen 7 | Gen 8 | |
| TZ200 | TZ250 | TZ270 | TZ280 |
| TZ300 | TZ350 | TZ370 | TZ380 |
| TZ400 | TZ450 | TZ470 | TZ480 |
| TZ500 | TZ550 | TZ570 | TZ580 |
| TZ600 | TZ650 | TZ670 | TZ680 |
If you want to learn more about the SonicWALL TZ series firewalls, visit their website: SonicWALL TZ Series | Entry-Level Next-Generation Firewalls
If you need help with networking at your business, call us at 561-556-2000.
Set Static IP address on a Windows computer
Here are the steps to set a static IP address temporarily on a Windows computer:
- Open the Control Panel.
- Navigate to Network and Sharing Center.
- Click on Change adapter settings.
- Right-click your active network connection and select Properties.
- Double-click Internet Protocol Version 4 (TCP/IPv4).
- Select Use the following IP address.
- Enter your desired IP address, subnet mask, and default gateway.
- Click OK to save the changes.
To revert back to a dynamic IP address:
- Follow steps 1-5 above.
- Select Obtain an IP address automatically.
- Click OK to save the changes.
Set Static IP address on a MAC computer
- Click Apple Menu → System Settings.
- Select Network.
- Choose the active connection (Wi‑Fi or Ethernet), then click Details.
- Go to TCP/IP.
- Set Configure IPv4 to Manually.
- Enter the following values (provided by your IT administrator or network documentation):
- IP Address
- Subnet Mask
- Router (Default Gateway)
- (Optional but recommended) Go to DNS and add the appropriate DNS servers.
- Click OK, then Apply.
Set Static IP address on Linux GUI
- Click the network icon in the system tray.
- Select Wired or Wi‑Fi Settings.
- Click the gear icon next to the active connection.
- Go to the IPv4 tab.
- Set Method to Manual.
- Add the following values:
- IP Address
- Netmask (or Prefix, e.g. /24)
- Gateway
- Add DNS servers if required.
- Save the changes and disconnect/reconnect the network.
Set Static IP address on Linux netplan-CLI
- Edit the netplan configuration file: sudo nano /etc/netplan/01-netcfg.yaml
- Apply the configuration: sudo netplan apply
Bash
network:
  version: 2
  ethernets:
    eth0:
      dhcp4: no
      addresses:
        - 192.168.1.50/24
      gateway4: 192.168.1.1
      nameservers:
        addresses:
          - 8.8.8.8
          - 8.8.4.4